Tuesday, August 30, 2011

Mini Quiche

So I decided to make some mini quiches the other day. My pie crust mini-muffin shells had gone over so well at the previous party, and I was having some breakfast parties coming up, so mini quiches seemed to be the perfect project. I wanted to let people try a variety of things in the party, so I decided to make two different kinds. One with cheddar, ham, bell peppers and onions, and the other with spinach, mushrooms and mozzarella. So the first step was to rehydrated everything. I just put a scoop of the Ham TVP, and all the veggies in their own separate tupperwares, added hot water, and put the lids on. I didn't really measure anything, just eyeballed it.

The cheese was a different story. I've tried letting it soak in cold water before, and it rehydrates well, but doesn't keep its individual shreds separate as well as I've heard the spray bottle method does. So I tried the spray bottle method. I laid a paper towel down on a cookie sheet, put a thin layer of each cheese on it, and generously squirted water on the individual strands of cheese. After a few minutes I went back to check and it wasn't fully rehydrated. I squirted it some more, and repeated this process probably 4-5 times. I don't know how long it will take normally. I went about my day and each time I passed by, I checked it and squirted it again. It did a great job of keeping the shreds separate, but it was a little more work. So I probably will stick to soaking in cold water for any recipe that is just going to melt the cheese anyway.


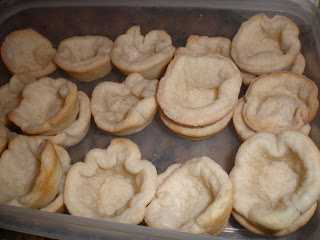
Meanwhile, I made my pie crust and put it in the mini muffin tin. Sorry the picture is sideways, I couldn't get it to load right.

Once the cheese was hydrated, I mixed up two bowls, each with 3 Tbsp of Egg powder and 6 Tbsp of water. Then I eyeballed the amounts of cheese, TVP or veggies I put in each. It only took a small spoonful to fill each pie crust. I baked them at about 350-375 for 15-20 minutes. And here's the results. They were so YUMMY!

Thursday, August 25, 2011

72 hour kits - how quickly could you evacuate?

I for one have never considered Virgina nor Colorado "earthquake" states. Yet they had some this last week measuring over 5 magnitude each. I don't consider Salt Lake City a Tornado zone, yet in 1999, fluke tornadoes appeared downtown and destroyed homes, shattered windows, and even claimed a life. No matter where you live, you should never consider yourself "safe" from natural disasters. Just because your region doesn't have a history of something, doesn't mean it can't occur. And even if you don't expect something will happen, you should still be prepared for if it does. After all, the unexpected, by nature, tends to happen when you least expect it.

Natural disasters aside, what if your neighbor's house caught fire, and jeopardized to burn yours along with it? What if your own home caught fire? What if a fireman came knocking on your door saying you needed to grab everything you would need for 3 days, and you had to be out in 10 minutes. Could you do it? Could you gather everything your family would need and remain level headed? Most of us would probably be running around in a panic, forgetting important things.

For these reasons and so many more, I think its important for each family to have 72 hour kits. These are ready packed bags that contain everything your family would need in case of an emergency.  You can make your own using any backpack, gathering all the supplies you might need, or you can buy some pre-made kits. Shelf Reliance sells both the individual emergency items you would want to include, as well as the pre-assembled kits.  Either way, make sure you add to your kit family specific items, such as medications, copies of phone numbers, IDs, pictures, lists of allergies, emergency contacts, etc. It's also a good idea to add in a book or deck of playing cards (something to pass the time) as well as some cash in low denominations.

Here's an example of the 2 Person Survival Pack 72 hr kit. It retails for $160, but if you order through me, it will only cost $79.10 (plus tax and shipping). Considering how much a decent backpack would cost just by itself, I think this is a great price. Here's what comes in it:

Kit Includes:
Essentials
  • 1 Heavy Duty Backpack (1 main compartment, 2 small top compartments, 1 medium compartment, and 2 zipping side pockets).
  • 1 Multi-function Knife (includes scissors, screwdriver, and nail file)
  • 2 (two) 3M®, N95 Deluxe Dust Masks
  • 1 Pair of Industrial Leather Work Gloves
  • 2 (two) 10-hour, Disposable Heat Packs
  • 10 Yards of 2” Duct Tape
  • 2 Bright Sticks (provides up to 24 hours of light, 12 hours each)
  • 2 name brand OB Tampons
  • 1 (one) 50-foot Rope
Shelter and Bedding
  • 1 Tube Tent with Rope
  • 2 Emergency Sleeping Bags – 84”x36” (windproof and waterproof)
  • 2 Ponchos with Attached Hood (one size fits all)
Communication
  • 2 Whistles
  • 1 Hand Crank Flashlight/Radio/Siren (no battery or electricity needed)
  • Universal DC Adapter for Portable Electronics (will charge cell phones, portable DVD Players, and any electronics with a DC plug in! Simply plug your DC device into the adapter, and plug the adapter into your hand crank flashlight. No batteries or electricity needed).
  • 1 Notepad and Pencil
First Aid
  • 1 First Aid Booklet
  • 1 Deluxe First Aid Kit Including:
    • 1 Pair of Scissors
    • 1 Ace Bandage
    • 1 Small Roll of Athletic Tape
    • 2 Iodine Pads
    • 2 Large Band-aids (4” x1.75”)
    • 20 Standard Size Band-aids
    • 4 Extra Strength Tylenol Caplets
    • 4 Pepto-Bismol Caplets
    • 2 Blistex Chapstick Pouches (.5g each)
    • 2 Antibiotic Ointment Pouches (.5g each)
    • 2 Sterile Alcohol Prep Pads
    • 1 Ammonia Inhalant Respiratory Stimulant
    • 2 (two) 3” x 2.25” Gauze Pads (2 ply)
    • 2 (two) 2”x2” Gauze Pads (12 ply)
    • 2 (two) 4”x4” Gauze Pads (12 ply)
    • 1 Pair of Tweezers (plastic)
    • 1 Pair of Disposable Vinyl Gloves
Food and Water
  • 12 - 8.45 fl. oz. Coast Guard Approved Emergency Water Servings
  • 2 Coast Guard Approved 3600 Calorie Food Bars
  • 1 Plastic, 8 Liter Emergency Water Bag (not pre-filled)
  • 8 Water Purification Tablets (1 liter per tablet)
Sanitation
  • 1 (one) 2-ply Toilet Paper Roll
  • 4 Tissue Packs (10 tissues in each pack)
  • 2 Toothbrushes
  • 1 Fluoride Gel Toothpaste (.6 oz)
  • 1 Hand Sanitizer(.5 oz)
  • 4 Wet Naps
  • 2 Cloth Wash Towels
  • 2 Re-sealable Storage Bags
  • 1 36” x 36” Heavy Duty Garbage Bag
If you're interested in ordering this, or any other emergency kits or emergency supplies, you can visit my website at http://www.whitneyhemsath.shelfreliance.com/.  Under the "Shop" tab, you'll see a link for the Main Website. And on the Main Website, you'll see a tab that reads "Emergency Kits and Supplies". You can order straight from the website, (the web pricing might be slightly higher than the prices I've quoted here), or you can contact me directly to get your order at the lowest possible price. ThriveWithHemsath@gmail.com.

Tuesday, August 23, 2011

Vanilla Whipped Topping

I LOVE Thrive's Instant Milk. Not only is it the best powdered milk I've ever tasted, but because its all cow's milk, it actually thickens and creams up. It makes a wonderful homemade ice cream (recipe posted previously) and it also make a great whipped topping. Here's how to make it:

Ingredients
1/2 cup ice water
1/2 cup Instant Milk Powder
1/2 cup powdered sugar
1 tsp vanilla

It is really easy. The most important part is getting everything nice and cold. Put the bowl and the beaters in the freezer to chill. I would even put the 1/2 cup water in the bowl to get ice cold (but don't let it turn to ice!).

Once it's cold, take out the bowl with the 1/2 cup water, add the 1/2 cup Instant Milk Powder, and turn on the beater. It'll take 3-5 minutes of beating (the colder it is, the faster it goes) and you'll see the milk start to thicken into a cream. Once it's thick and creamy, add the powdered sugar and the vanilla, then continue to beat. It will turn into a wonderful whipped topping for pancake, brownies, fruit, pie, well, just about anything!

Mine never formed super stiff peaks like in the Shelf Reliance picture, but it did achieve soft peaks. The consistency is more like Dreamwhip than Coolwhip. My husband said as an every day whipped topping, this was a 7 or 8, because he would still prefer to use Coolwhip on an every day basis. But as an emergency recipe, it rates a 9 or 10 and he's grateful we can have whipped topping whenever we want.

Here's a link to Kelsey Nixon (of food network stardom) showing you how to make it. (Shelf Reliance has a you tube channel with great videos). I figure this is better than my personal pictures. Enjoy!

Thursday, August 18, 2011

Sweet Potato Muffins

The following recipe is from the THRIVE website, as well as on the back of the #10 can of Sweet Potatoes. The original recipe called for 1/2 cup apple juice concentrate and 1/4 oil, but I didn't have concentrate, and I wanted to cut some fat out, so I just substituted 3/4 cup applesauce instead. I also cut back a little on the amount of nuts and butterscotch, again, trying to tone down our fat intake.  I think the applesauce might have made mine a teeny bit "gummier" than the original recipe would have produced, but they were still YUMMY! Hubby hasn’t tried them yet, but a friend of mine did and she said she really liked it, and there were no leftovers from the party I took them to this morning. It’s a good way to sneak a little fruit and veggies into your kid’s diet as well. Anyway, without further ado, here’s the recipe.

Ingredients
  • 1 cup THRIVE Sweet Potatoes (dehyrdatred)
  • 3/4 cup Unsweetened Apple Sauce
  • 1/2 cup THRIVE  Instant milk (1 T powder + 1/2 cup water)
  • 1 Tbsp THRIVE Whole Egg Powder (+ 2 Tbsp water) 
  • 1/2 cup Honey, warmed 
  • 2 1/2 cups All-purpose White Flour
  • 1 tbsp Baking Powder
  • 1/2 tsp Baking Soda
  • 1/2 tsp Salt
  • 2 tsp Cinnamon
  • 1/2 cup Chopped Pecans 
  • 3/4 cup Butterscotch Flavored Chips
Dehydrated Sweet Potatoes in can
 Directions

Bring 3 cups water to a boil and dump in the 1 cup Sweet Potato pieces. Boil 10-15, or until rehydrated. Drain.

Place rehydrated sweet potatoes in a blender with the apple sauce, milk, egg, (you can reconstitute ahead of time, or just throw the powder and the water in together) and warmed honey. Puree together until smooth.

Puree mix
In a separate bowl, combine all the dry ingredients. Pour in sweet potato puree and mix. Mixture will be thick and sticky.

Final Muffin Batter
 Grease your muffin tin or use liners. Preheat oven to 400.  I baked mine as mini muffins, and they baked for 15 minutes. Larger muffins will take longer. I doubled my batch, and I still have what looks to be about half the batter left.  Based on that estimate, a single batch should yield 4-5 dozen mini muffins. And here's the nutritional breakdown on each muffin. Enjoy.


Monday, August 15, 2011

Pie Crust

I found a basic flaky pie crust recipe that I'm in love with. I tried adapting it to use my THRIVE shortening, and it worked pretty well. And it is seriously so easy.

1 1/4 cup THRIVE white flour
1 cup THRIVE Shortening Powder
1/4 tsp THRIVE salt
7 Tbsp ice cold water

Mix together all dry ingredients with a fork.

 Add the ice water and stir for a few minutes until soft ball of dough is formed.

Roll out on a floured surface to desired thickness. Makes one 9" unbaked pie crust.

You can use the unbaked crust to make just about any kind of pie that requires baking. Just place it in the ungreased pie pan, fill with whatever filling you like (apple, chicken pot pie, quiche, etc) and bake according to that recipe's instructions. Or you can bake the crust by itself and fill with something non-baked, like pudding, fresh fruit, whipped cream, or what I did, Chicken Salad. I chose to roll my dough out and cut it with a round cookie cutter, and put the circles into a mini cupcake dish, thus baking mini crusts. Filled those with Chicken Salad, and they went over very well at the party I served them at. Hubby didn't get to try any, but all the party people said they like it, and were surprised at how soft the crust was. It might look in the picture like you're getting a hard crispy crust, but this actually came out pretty soft. My non-THRIVE version does come out a little flakier, which I prefer, but these are still very good, and allow me to make a pie crust without getting a measuring cup covered in shortening that I will then spend 5 minutes and 1/4 cup of Dawn trying to clean. And I didn't have to use a pastry cutter for 5 minutes. For that reason alone, I am a fan and will be using the recipe again this week to try little mini quiches with my powdered eggs and other THRIVE ingredients.

Thursday, August 11, 2011

Black Bean and Lentil Chili

In light of my husband's gall bladder removal surgery, I have been busy hunting for some no or low fat main course meals, and since he's still not supposed to lift more than 10 pounds (and our five month old is double that) I need them to be meals that can cook themselves, because I don't have a lot of time or extra free hands to be cooking with. Just when I thought I would never be able to make the needed adjustments, who should come to my rescue, but THRIVE!

I had an idea for some chili, and threw a whole bunch of my THRIVE ingredients into our big pot.

 I added water, and let it simmer by itself while I dealt with my kids and other household obligations. When it was done, I dished up a bowl for my hubby, he said, "Wow. That's really good." I don't know why he always has a surprised tone to his voice, he should know by now that if I'm making it with THRIVE, it's going to be good. I forgot to ask him to rate it, but since he's been depressed about his restricted diet, and he actually smiled and complimented this dish, I'd say it rates pretty high up there. We put a little fat free sour cream on top, but the flavor was so nice, we didn't even really miss the shredded cheese that normally dons our meals.


Personally, I'd rate this recipe an 8.5 for taste, a 10 for nutrition, and a 10 for ease. Dump it all in a pot, add water, bring to a boil, reduce heat and simmer for 50-60 minutes. And done. It doesn't get much easier then that. And as far as health goes, a 1 cup serving of this has only 200 calories, less than 1.5 grams of fat, over 14 grams of fiber, and more than 15 grams of protein. It is also completely vegetarian, thanks to the TVP.  So it is quite a good-for-you dish as well. You might want a little extra salt - I know a lot of people are trying to watch their sodium, so I always err on the side of not enough salt in my recipes, and let people add more to their individual bowls if they want.

Anyway, here's what I put in it. This yielded about 10 cups of chili, so feel free to halve it if you need:

Ingredients

  • 1 1/2 cups lentils (THRIVE sells lentils, but I needed to use up some others I still had, which is why they're not pictured below)
  • 2 cups THRIVE Instant black beans
  • 3 tbsp THRIVE  Mixed Bell Peppers
  • 1/3 cup THRIVE Freeze-Dried Chopped Onions
  • 3/4 cup THRIVE Freeze-Dried Sweet Corn
  • 1/2 cup THRIVE Taco TVP
  • 1/3 cup THRIVE Tomato Powder
  • 1 tsp Ground Cumin
  • 1 tsp Salt
  • 1/4 tsp Chili Powder
  • 11-12 cups Water


There you have it. Dump the ingredients in the pot. Add your water (start with the 11 cups, and add 1 more at the end if you don't want your chili as thick). Bring to a boil, reduce heat and simmer for 50-60 minutes (that's how long it takes the lentils to cook). It's important to use THRIVE's INSTANT Black Beans, not the regular black beans. Regular Black Beans will take hours to soak and cook. The Instant Black beans have been par-boiled, which eliminates the need to soak them, cut cooking time down to 20-30 minutes, and yet still preserves the shelf life at 25 years. My kind of beans. :-) And just so you know, these are whole beans, not bean flakes that only turned into refried beans. Here's what they look like.


For those wanting the full nutritional value, I plugged my recipe into livestrong.com's recipe creator (I'm using their daily plate feature to count calories and try and lose weight). Here's the breakdown:
This recipe is also the first, of what I hope will be many, of my "Freezerless Meals". I've got a friend who makes some great freezer meals to have on hand, and I've enjoyed going to her classes and making those meals. But I don't have room in my freezer to store anymore ready made meals. I do have room in my pantry though. Because everything gets added to the water at the same time and cooks together, this a meal you can make ahead of time, throw in a ziploc bag, write the water and cooking instructions on the outside, and leave in the pantry for future need. It takes just as long to cook it as thawing and baking a freezer meal (if not less time), and you could also halve the recipe, put it in a tall mason jar with some decorative ribbon, and now you've got a great gift for just about any occasion (who doesn't love food?) 

To order your THRIVE foods for this great recipe, just contact me at ThriveWithHemsath@gmail.com or call me at 714-683-7562.

Sunday, August 7, 2011

Just a reminder - sale ends August 8th (Monday)

 For those of you who are anxious to get back to more product review and recipes, I promise those are coming this week. This last week has been all about recovering from our hospital adventures, and I haven't done much cooking. But I promise, you'll see a lot more recipes and reviews coming up. Meantime, I just wanted to remind you that the 2 person, 3 month food and water package sale ends Monday August 8th, and the 1 year 4 person package ends August 14th.

If you purchase either package, I will happily create a "party" with you as the host so you can take advantage of Host Benefits (HB).  HB are are designed to reward a host with an opportunity to get free and half-off products based on order totals.   So...

For ordering the 1 Year 4 Person Package for $2848.99 you will receive $285 in Free and $350 in Half-off HB.

For ordering the Food and Water Package for $945.29 you will receive $95 in Free and $150 in Half-off HB.

It's like getting a deal on top of a deal!  Contact me to place your order before the deadlines - you won't want to miss out!  

Aug 8 - Food and Water Package deadline
Aug 14 - 1 Year 4 Person Package deadline


Friday, August 5, 2011

Great sale through August 8th! Two person, 3 month package, with food, water and wheat grinder

The 4 person, 1 year food storage package is still going on until August 14th for $2848.99 (+ tax and shipping). But Shelf Reliance has made available another package with a special sale price. This one would be a great 3 month supply for 2 people, and includes more than just food - you get a water kit and wheat grinder as well.


The food portion contains 4,251 servings of food, which will provide more than 2,000 calories per person, per day, for up to three months. The foods come in 96 #10 (gallon sized) cans. To purchase it all separately, even with the Q club and case discounted prices, the following items would cost you $1278.84 before tax and shipping. But if you order by August 8th, you'll pay only $945.29 (plus tax and shipping), which means you save over $330! That's like getting the wheat grinder, the water kit, the eggs, all the TVP and both cheese blends for free! And what's more, if you let me place your order, I'll put it in as a party, which means you'll get 10% back in free product. So everything the package comes with, PLUS another $94.53 in FREE food or other products of your choosing. All for $945.29 plus tax and shipping.

Here's the details of what this great package includes. Don't put off your food storage any longer. Jump start your storage with over $330 in savings by contacting me today. This sale ends August 8th!

Food and Water Package Contents; Catalog #25357
  • 4,251 total servings
  • Foods are contained in 96 #10 (gallon size) cans
  • Over 2000 calories per person/day for up to three months
  • Ideal for a 3 Month, 2 Person supply

Grains/Starch
  •     6 Hard White Winter Wheat
  •     4 Potato Chunks
  •     3 Potato Beads
  •     6 Elbow Macaroni
  •     6 Six Grain Pancake Mix
  •     3 Cornmeal
  •     3 Quick Oats
  •     6 Instant White Rice

Fruits/Veggies
  •     6 Sweet Corn – Freeze Dried
  •     6 Green Peas – Freeze Dried
  •     3 Broccoli – Freeze Dried
  •     3 Raspberries – Freeze Dried
  •     2 Strawberries – Freeze Dried
  •     6 Apple Chips
  •     3 Carrot Dices
  •     3 Mixed Bell Pepper

Dairy/Cheese
  •     6 Non-Fat Powdered Milk
  •     4 Chocolate Drink Mix
  •     2 Cheddar Blend

Meats/Beans
  •     2 Bacon TVP
  •     2 Beef TVP
  •     2 Chicken TVP
  •     2 Taco TVP
  •     2 Pinto Beans
  •     2 Black Beans
  •     Kidney Beans
  •     Whole Eggs

Miscellaneous
  •     THRIVE Orange Drink
Water Storage & Tools:

  •     Deluxe Wheat Grinder - Hand Mill 
  •     55 Gallon Water Container 
  •     Water Pump - (45" long, 3" wide) Hose (47" long, 1"wide)
  •     Sturdy Bung Wrench
  •     Water Treatment Solution

Monday, August 1, 2011

Money, money, money

I've talked about the importance of storing both food and water in case of emergency. Today I want to address another very important part of your emergency preparedness, and that is, MONEY. I know in this economy, money is not easy to come by.   Shelf Reliance's Q program is a great example on how to work with budgets to slowly achieve your goals, and THRIVE foods can actually save you money, which money you can put aside for a rainy day. And trust me, when it rains, it pours, so that financial umbrella is important to have.

Personal example - I am currently typing this on my husband's laptop, in a hospital room. I'm not typing on my laptop because my 2 year old cracked the screen and I haven't forked over the money to fix it yet (the manufacturer's warranty isn't covering it). I'm at the hospital because my husband had bad stomach pains last night that took us to the ER and it wound up being impacted Gall Stones. They admitted him and12 hours later, he's in the O.R. to have his gall bladder removed. I can't wait at home during this process, because last night, our AC unit broke and the house is unbearably hot. So a technician is out looking at that right now. Between those three things, we're likely going to have to cough up a few thousand dollars. We had another emergency earlier in the summer that took up $2500. And now this. We had been saving up for years, and left a chunk in our savings account that we didn't spend on furniture or vacations, it was there just for emergencies.  How grateful I am now that we were disciplined enough to do that. Our savings will likely be completely depleted and we'll be living pay check to pay check, but he starts teaching again this coming week, so we will have pay checks again, and we'll be okay.  We might have to live off our food storage for a month or two so we can replenish some of our savings, but we have THRIVE foods, so I'm actually excited to do that!

When it comes to saving for emergencies, your goal should be to have three months of your expenses in the bank. I know, that's a lot, but don't let that daunt you. Start working just towards 1 month of expenses and go from there.

Another aspect of Money Storage I want to mention quickly is the importance of having some cash tucked away. A couple hundred dollars, dispersed amongst 72 hour kits, or hidden somewhere safe in your home. If there is a state of emergency in the community, and power is down, credit cards, ATMs, all our "paperless" ways of payment will be useless. Now, ideally, you will have stored up everything you'll need, and you won't have anything you need to buy. But you never know if there's something else you'll need, so to be safe, have cash on hand. And have it in small bills. You don't want to get stuck paying $20 for something that only cost $5, all because the power is out and they don't have change.

So there you have it. Store up the essentials like food and water, and do it on a budget through Shelf Reliance's Q program, so that you have a little money you can save as well for other emergencies that life may throw your way. How grateful I am we had our savings, and how grateful I am we have our food storage. Because we were and are prepared, I do not fear.